Thursday, May 21, 2015

How to Build a Deck- Part 2 (Rails)


Deck Handrails


OK, so now you have the deck framed and the flooring laid.  The next step will be to install the handrails.  Before we talk about how to install them, let's take a look at a few different methods and styles of handrails.


These are just a few methods, but the one we will discuss will the first method.  To build these, you will need the following.

Materials:
Tools:

**Affiliate links are used on this page.  See my disclosure page for more info on affiliate programs.

The first thing you'll need to do is cut the deck posts to the correct length.  The height of the handrails should be 36" from the deck floor.  Since we will be using a 2"x 6" cap on the rails, we will allow for this on the posts by subtracting 1.5" from the height, which leaves you with 34.5".  Measure this on all posts and cut to length with either a Circular Saw or a Reciprocating Saw.
Deck Handrail Components
Now that the posts are all cut off at the same level, you can install the top rail and bottom rail all around the perimeter, except in between the posts where the stairs will go (we'll get to that in the next article-  Part 3).  These will be installed horizontally from post to post and attached to the inside edge of the posts, but even with the outside edge using 3" exterior screws.  The top rail should be even or flush with the top of the posts, while the bottom rail will be set at 4" from the floor.  This allows room to sweep debris from the deck onto the ground if needed.
Once the rails are installed, it's time to put in the balusters.  You can either rip 2"x 4"s in half on a table saw to make them into 2"x 2"s or just buy them from the lumber yard or home store already cut to 2"x 2".  The balusters should be all cut to length at 30.5".  You can also cut an angle (30 or 45 degrees) on the bottom of the balusters to make them look more decorative if you like.  These balusters will need to be installed on the outside of the top and bottom rails in a vertical manner using 3" exterior screws.  It's important to make sure that the spacing of the balusters does not exceed 4".
After all of the balusters have been installed, the last step remains, .....the cap.  I like to use a treated 2"x 6" as my cap.  It's wide enough to cover the top edge of the posts, rails, and balusters, and still leave enough to let it have about a 1/4" overlay on each side.  These should be cut to fit all around the rails, again using 3" exterior screws.  Make sure to join the corners of the rail by mitering the top cap at a 45 degree angle.
Mitered Handrail
When your all done, it's a great idea to give the handrail system a good sanding, especially the top cap-  Nobody likes splinters!
Now that you've already learned Part 1- How to Build a Deck (Framing), and now you've been through this Part, be sure to check out the next in the series...How to Build a Deck- Part 3 (Stairs).

Wednesday, May 20, 2015

How to Build a Deck- Part 1 (Framing)


Deck


A deck is a great place to enjoy the outdoors at your home.  It can also improve the value of your home, as well.  If this is something you have thought about doing but figured it was too much of a task to do by yourself, I'd like you to think again.  Sure, decks can be of many different sizes, styles, and can definitely require different skill levels.  If you follow some simple guidelines and suggestions, building a deck can be an enjoyable experience and definitely be a DIY project for you!
Before you get started, here are a few things to keep in  mind:
  • When deciding the dimensions of your deck, think about the lumber you'll need.  Lumber is usually sold in 2 foot increments (8', 10', 12', 14', 16', & 20').  Keeping the deck as close to these dimensions will help the overall cost of materials.  Also, the length of you floor joists will determine was size boards you will have to use.  For example, with joists spaced at 16", a 2"x 8" can span up to 12'.  A 2"x 10" can span up to 15' and a 2"x 12" can span up to 18'.  This can definitely affect the cost of materials as well.
  • How high will the deck be off the ground?  The higher your deck is off the ground means you'll need longer posts and more steps to build.  The lower your deck is to the ground means you can get by with shorter posts and less steps.  If you build the deck close to the ground, you may not even need rails.  
  • What materials do you want to use?  The most common used material is treated pine, which is also the most economical.  With a little more cost, you could go with cedar.  Cedar looks good and is naturally resistant to rot.  The latest product on the market for decks is Composite Decking material.  This is a great product because there are no splinters and it never rots or needs to be painted.  The downside of it is the cost.  Composite deck material is very expensive, but over time, can save you money because of it doesn't need to be treated periodically and because of its overall longevity.
Tools Needed:
Materials Needed:
  • Deck Lumber
  • Joist Hangers
  • Concrete (Quickrete)
  • Screws
**Affiliate links are used on this page.  See my disclosure page for more info on affiliate programs.

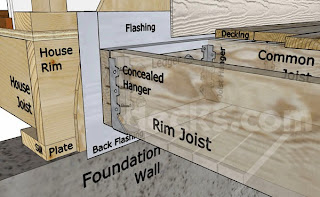
The most important components of a deck are the posts, beams, ledgers, and joists.  These parts support and distribute the weight. (See Picture Below)

Deck Components

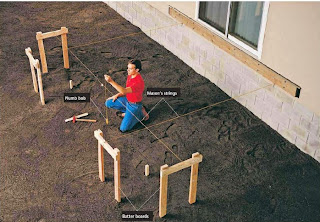
To get started, decide on where the deck is going to be located and attach the ledger board (2"x 8") to the house.  This should be attached using lag bolts and they need to be long enough to reach the rim joist on the house and/or the studs of the house.  Make sure to attach a piece of metal flashing between the ledger board and the house, with the flashing extending behind the house siding where it is above the deck.  The ledger will serve as a reference for laying out the concrete footings that are needed for the posts.  A good practice for this is using batter boards and string (See picture).
Post Layout
While doing this, you should check to make sure your layout is square.  The best way to do this is to measure from one corner to the opposite corner diagonally.  After this, repeat the process for the opposite diagonal corners.  Make adjustments if needed to ensure the two measurements are equal.  Once the two measurements are the same, the layout will be square.
At the corners of the layout, you will need to dig a hole for concrete footings.  These footings will help support the weight of the deck coming down from the deck posts.  They will also need to be deep enough to be below the frost line so
Deck Components
that the deck doesn't move when the ground freezes during the winter.  Frost lines vary depending on the region you live in so make sure you check with your local building codes to determine this depth.  You should have footings for posts on every corner, as well in between the corners, not to exceed 5' between them.
Once the footings are poured and have dried, you can now attach a metal post bracket to the concrete.  This will need to be in the right place so that the post will fit in the corner perfectly.  After all brackets are in place, cut the deck posts (support legs) long enough to reach just above handrail height.  Now install all posts in the brackets.  You should make sure they are plumb and hold them in place (vertically level) with 2"x 4" braces going to the ground.
Now that the ledger board is up and the posts are standing and braced off, attach the rim joists (boards going around the perimeter of the deck) to the posts and ledger using 3" exterior screws.  These will also be 2"x 8" boards.  A 4' level will help to ensure that they are level all the way around.  Once the rim joists are in place, start measuring your layout along the ledger board and the outer rim joist (the board at the opposite end from the ledger).  This layout will show you where the floor joists will be placed.  All floor joists should be, at minimum, 16" on center.  This means that, from the center of one joist to the center of the next, there will be 16".  Spanning the joists further than this will allow the deck planks on the floor to sag and bounce.  2"x 8" joist hangers should also be used on the inside edge of the ledger and rim joists to allow for the floor joists to lay in and fasten to.

Joist Layout

Once all of the 2"x 8" floor joists have been installed, you will now need to install bridging (sometimes called noggin) between the joists.  This is to strengthen the frame and is usually done by using up all the scrap material and cut-offs.  These will be boards placed between the joists and should not exceed 8' between them.  You are now ready to start installing the flooring.

Deck Planks
Flooring can be done using either 2"x 4"s, 2"x 6"s, or treated deck planks (these are typically 1"x 5.5").  These planks can be installed either perpendicular to the joists or at an angle.  The most common way is perpendicular.  It is a good idea to start the flooring along the outside edge of the deck.  All planks need to extend past the rim joists by at least 1" to 1.5".  Make sure you leave a 1/4" gap between these planks to allow for water to drain.  You will also need to use a Jig saw to cut a notch around the posts.  By starting at the outer edge, usually the notch around the post will be done with the first two rows.  Attach the planks with 3 exterior screws at each floor joist.  When you get to the last row, you will need to rip the board down to the size needed to fit next the the house wall.

Please look the for the next post How to Build a Deck- (Rails) where we will discuss different types of handrail systems and how to install them!

Tuesday, May 12, 2015

Top 5 Residential Siding Options

Residential Siding

Are you planning on building a home soon?  If so, you've probably already been overwhelmed with all of the different choices and decisions that go into the building process.  Starting with the floor, you have to decide whether you want a wood floor or concrete floor.  There's also what kind of roof?, what kind of insulation?, Trim?, Doors?, Floor coverings?, Cabinetry?...........you get the point.  I'm not trying to scare you, but hopefully educate you.  My intentions here are to give you some insight, as well as pros and cons, that will possibly help you make good decisions.  Decisions that you'll be happy with in the future.

This post is going to be focused on the exterior of your house.  Have you already made your decision?  If not, let's take a look at some different options.


Brick Siding

1.   Brick or Rock
Brick and/or Rock is a very common choice when building a home because of its durability.  Brick will last for many decades and will probably last as long as the structure does.  Light maintenance is all that is usually required with that being the occasional power washing.  The downside to using brick or rock as a siding option would be the cost.  This is usually at the higher end of all siding options.  But once it's done,...it's done! 


Vinyl Siding

2.   Vinyl Siding
Vinyl siding is probably the most popular siding that has been used for the past several years, mainly because it is mostly maintenance free and also its relatively low cost.  Vinyl siding is easy to install and will not rot and doesn't have to be painted.  It now comes in many, many different styles and colors.  The downside to vinyl would be that the color can fade over time and it does need to be cleaned periodically.  Typically a vinyl siding detergent and a power washer will take care of this every year or two.  This can easily be a DIY project as well!


Log Siding
Cedar Siding


3.    Wood Siding
Wood siding has many different options in itself.  Cedar is a very popular wood of choice for siding purposes.  It is naturally resistant against rotting and can be installed in different ways, such as Lapped horizontally, Board & Batten, and also by using Cedar shakes.  For several years now, there has been a Log siding on the market, which gives the look of a traditional log cabin, but still using traditional building methods.  This too is at the higher end of cost to install, but it also has a high cost of maintenance as well.  Wood siding has to be treated with water sealers periodically and thus the costs to keep the siding in good shape will continue over time.  


Fiber Cement Siding

4.    Fiber Cement Siding     
Fiber Cement Siding is a good option for the fact that is NOT wood, and therefore, is termite-resistant and water-resistant.  It comes in an array of forms and textures and is installed the same way as actual wood siding.  It will typically cost more than vinyl siding but less than wood siding.  It is NOT totally maintenance free though......it will require painting.


Stucco Siding
Stucco Siding


5.    Stucco Siding
Stucco is a type of cement mixed with other ingredients, such as sand and lime.  It is typically spread over metal screening that has been attached to the walls.  It can also be spread over a masonry surface.  It can be tinted when mixed to achieve the desired color or even painted afterwards.  Stucco has been around for many years and, although it is not very common in all regions, it is a good siding option.


Although there are many more siding options, these are probably the most popular choices of today.  Some things to keep in mind when deciding are:

  • Installation Costs
  • Costs Over time
  • Return on Home Value
  • Individual Style You Prefer
If you don't plan on living in your new home permanently, then the upfront costs should be important to you, as well as the return on your home's value when you decide to sell.  If this will be your home for many years to come, then the cost of maintenance over time should definitely be considered, along with your personal style and taste.  Sometimes this can be worth more to someone than the overall costs.

10 Safety Tips for Using a Ladder