Recently, my wife was wanting to do some updating to the inside of her hair salon. This involved painting the walls, removing an old L-shaped reception desk (that she has always hated) and building her a new one. She didn't want just any ordinary desk to replace the old one, she wanted one that was round (or oval) on the front. It took a little head scratching at first but I was up for the challenge. The desk would be approximately 8 ft. long (or around the oval front), with an 18" wide top at 44 in. high. It would also have a desk top on the back side for her computer and printer at 28-1/2" high. Finally, since she is always apt to moving furniture around, it would need to be on wheels. Although this project was a little challenging at first, it wasn't too difficult. Best of all, it only cost about $200 for the materials!
If this is a desk you would like to build yourself, hopefully I've done the head scratching for you. Let's get started with what you are going to need.
Materials Needed:
- (1)- 3/4" plywood (CD grade)
- (1)- 3/4" plywood (nicer grade, this will be the top of the desk)
- (3)- 1/4" plywood (nicer grade, this will be the front of the desk)
- (10)- 2"x 4"x 8'
- (2#)- 3" screws
- (1#)- 1-5/8" screws
- 1" Brad Nails
- Paint or Stain (your preference)
**Affiliate links are used on this page. See my disclosure page for more info on affiliate programs.
 |
On the ends of the wall, you will need to frame a small wall section that will come back in at a 90 degree angle. Allowing for the thickness of the curved wall with the plywood that will be on the front, this wall will need to be 11" long. Build these two walls just as before, only you can use the 2"x 4"s for all parts (top, bottom and studs). Once they're assembled, attach one to each side of the curved wall using 3" screws.
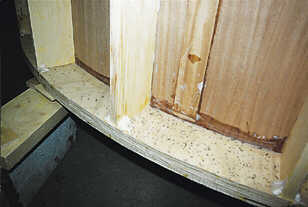
The next step will be covering the front and sides with plywood. Because it's extremely hard to get 3/4", or even 1/2" plywood to bend, you will need to use 1/4" plywood to wrap around the curved front. Start be cutting the plywood to 40" wide using a Table Saw or Circular Saw. This will allow for the plywood to hang over the bottom of the framework by 1/4". Using a Brad Nailer, attach the plywood to the front of the curved desk with 1" brads. It's a good idea to use some wood glue for some extra holding power. Once this is done, apply a second layer of 1/4" plywood using the same method. Using the remaining 1/4" plywood, cut out pieces and attach to the sidewalls, as well as the end of the sidewalls too.
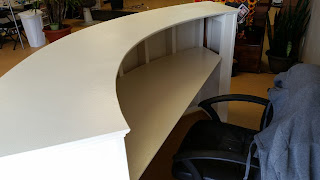
For the top of the desk, you will need to use a nice piece of 3/4" plywood. I used birch and then painted it. Choose your material depending on whether you wish to paint or stain the desk. To get the right curve for your top, you can lay the whole piece of plywood on top of the desk with one edge hanging over by about 2". Once you have it placed accordingly, trace out the front edge. Now, moving the sheet of plywood forward 18", trace it again.
 |
| Your Top will look like this! |
 |
| View from Behind the Desk |
Using metal shelf brackets underneath both the top and lower desk tops will help ensure they are good and sturdy.
Final touches on the desk can be totally up to your preference and style. As you can see, I used outside corner trim on the corners. Also, my wife really wanted to install trim on the front of the desk in three sections. It's cut and installed like picture frames. As always, she has a great eye for these things and this was no different. I think it really made it look great! She decided to paint this desk a creamy white. We also applied a water-based clear coat to the top to ensure it would be durable and long-lasting. The final step to this project was installing four 2" swivel casters with locks. Like I said earlier, my wife is always moving things around. This should definitely help her out whenever she feels the need to change things up!
 |
| Side View |
Thanks to my wife for the opportunity to do this project! As always, I look forward to any comments you may have regarding this post.
 |
| Finished! |


Nice! Thanks for the explanation.
ReplyDeleteThis is beautiful! Thank you for sharing the step-by-step! Question - when you put the second layer of 1/4" plywood on the front, was it not shorter than the layer underneath by a bit? If so, did you just cover that with the side pieces? Thank you!
ReplyDeleteYes, it was slightly shorter. It wasn't much, though. The outside corner trim pieces covered that nicely.
DeleteThey fixed everything perfectly in one visit. handyman brighton
ReplyDeleteAll of our handymen have many years experience in the painting and decorating trades and they appreciate the need to ensure that all painting and decorating work is properly finished to a high standard. Point Cook handyman
ReplyDeleteQuick diagnosis, quick repair. handyman Richmond
ReplyDeleteNice post — building a round reception desk like that is no small feat! If anyone in the Atlanta area wanted to take on a similar project but needed backup or a pro touch, a Handyman in Atlanta could really help bring such a design to life safely and efficiently.
ReplyDelete