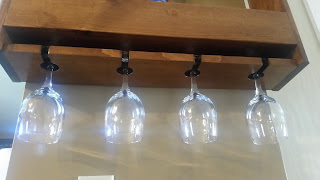
Are you looking for a good place to keep your bottles of wine? Not only does this wine shelf look really nice, but it keeps the bottles and the wine glasses all together in one location. Sure, you can go buy something similar to this and just hang it on the wall and be done with it. But what fun is that?! Not only is it cheaper to make your own, but you can also customize it to fit your need or preference. Besides, there's a great value you can put on something you made with your own hands. To top it off, this shelf isn't a hard build and doesn't require a lot of different tools. So let's get started!
Tools Needed:
- Tape Measure
- Table Saw
- Miter Saw
- Jig Saw
- Palm Sander
- Router (Optional)
- KREG Pocket-Hole Jig (Optional)
Materials Needed:
- 1" x 6" x 8' White Pine board
- 1" x 8" x 8' White Pine board
- 1-1/4" Pocket-hole screws (Coarse-thread)
- 2" Finish Nails
- Wood Stain
- Polyurethane
**Affiliate links are used on this page. See my disclosure page for more info on affiliate programs.
This shelf was built using white pine, which is a soft wood and is very easy to work with. It is easy to shape and sand. It can also be stained to achieve the color of your choosing. All the boards have square cuts with all pieces butted together and joined using pocket-hole screws. This is a very simple method of joinery and leaves all screws hidden. The only thing you need is the KREG Pocket-Hole Jig and it is not very expensive. If you not familiar with this system, you can check out my previous post: "Discovering Pocket-Holes!".
Using the table saw and miter saw, the first thing you will need to do is Cut all the pieces to correct length and width. Since a 1" x 6" actually measures 5-1/2" wide, all the pieces of that board will only need to be cut to length on the Miter saw. A 1" x 8" actually measures 7-1/4" wide and only three pieces of that board will need to be cut to width on the Table saw. There are only eight total pieces (four off of each board) needed to make this wine shelf. See the following list for correct measurements:
(1" x 6" x 8' Board)
- 18" L x 5-1/2" W (Left Side)
- 18" L x 5-1/2" W (Right Side)
- 24" L x 5-1/2" W (Front)
- 24" L x 5-1/2" W (Bottom- Glass Holder)
(1" x 8" x 8' Board)
- 24" L x 7-1/4" W (Back-Bottom)
- 26" L x 6" W (Top)
- 24" L x 4" W (Bottom of Wine Bottle Shelf)
- 24" L x 3" W (Back-Top)
 Now that all of the pieces are cut to length and width, you will need to Cut the slots in the very bottom piece. These slots will allow the wine glasses to slide in and hang upside down from the shelf. You will need to mark 1/4" wide slots 6" apart from each other. Since the inside of the shelf is 24" long, and this shelf will have 4 glasses hanging from it, you can mark the first slot at 3" from one end. After that, mark your next slot 6" away. Repeat the process for the next two and you should have 3" remaining to the other end, which would make the slots centered in the shelf. Once all the slots are marked, measure a center point (lengthwise) along each slot. This should be at 2-3/4". At that point you will need to drill a 1-1/2" hole through the board. After all the holes are drilled, use the Jig Saw to cut the slots you already have marked from the front edge of the board to the holes. This allows a glass to slide through the slot and sit down just a bit in the hole. The hole keeps the glass still and free from sliding around.
With everything cut, it's time to Assemble all the pieces. As I said earlier, I prefer to use pocket-holes screws to assemble this shelf, but if you don't have the KREG Jig, you can still use 2" finish nails instead. Regardless which method you choose, it is very Important to make sure and use some wood glue in every joint! To get started, you will need to attach the Front piece to the Shelf Bottom piece. The front should cap over the shelf bottom, using pocket-hole screws through the bottom of the shelf piece. Next, attach the other edge of the shelf bottom to the Bottom-Back piece, again using pocket-hole screws through the bottom of the shelf piece. Make sure to leave the Bottom-Back piece hanging 1" below the Shelf Bottom. This allows an open slot for the bottom of the glasses to slide through. Next you can attach the Bottom-Glass Holder piece to the Bottom-Back piece using pocket-hole screws through the backside of the Bottom-Back piece. After this, attach the Left Side piece, making sure everything is straight and square. Repeat this for the Right Side piece. Once you've got this far, attach the Back-Top piece in between the Left and Right sides along the back side at the top. Again, use pocket-hole screws from the backside of the Back-Top piece. The only thing left now is to attach the Top piece. You can do this by using pocket-hole screws through the inside of the side pieces or just use 2" finish nails through the top into the side pieces. The Top should be hanging over the side pieces by 1/2" on each side.
 After it's all assembled, it's time to Apply the Finish. Again, this is where you can customize this shelf to your preference. I chose to apply a Minwax English Chestnut stain. This was done by applying it with a cotton rag and then wiping away the excess with another cotton rag. After waiting approximately 8 hours or so, I applied a coat of Minwax Semi-Gloss Polyurethane, using a foam brush. You'll need to wait 4-6 hours for this to dry. Once dry, lightly sand the shelf with 220 grit sandpaper- very lightly! Wipe away all dust using a cotton rag with a little paint thinner on it. Follow this with a tack cloth to make sure ALL dust has been removed. You can now apply a 2nd coat of polyurethane. Be careful to not allow it to run. To really make it nice and smooth, repeat the same steps for a 3rd coat of polyurethane, but make sure to use a 400 grit sandpaper on this step.
Done! That wasn't that bad, was it? Now just hang it on the wall and fill it up. Hope this was helpful. Please leave me a comment with your thoughts or maybe even share some ideas of your own!
Good luck and God Bless!


